
The CookTwo App — A Complete Visual Guide
Take a quick tour of CookTwo — every screen, every button, every feature. See what the app actually looks like in someone's hands.
Welcome 👋
This is a visual tour of every screen in the CookTwo app — what the buttons do, what the badges mean, and how everything fits together. Use the table of contents to jump around, or read it start to finish in about 12 minutes.
What CookTwo is
CookTwo is a shared food system for two people. One kitchen, two different goals. You and your partner (or just you, on your own) share a single grocery list, a single pantry, and a single AI meal planner — and the app figures out how to make dinner work for both of you from one pan.
If you’ve just downloaded it, here’s the short version of how it’s organised:
- Shopping tab — a real-time shared grocery list that syncs between both of you in under a second.
- Pantry tab — a typed list of what’s in your kitchen, so the AI can suggest meals using food you already have.
- Meals tab — a chat with the AI that generates dinner ideas, splits the recipe into two plates with different macros for each of you, and adds anything you’re missing to the shopping list.
- Profiles tab — your diet, your goals, your body profile, and the plan you’re on (Free or Premium).
Everything is partner-coloured. Partner A is sage green, Partner B is terracotta — every item, every action, every notification has a small dot showing who added it.
That’s the whole shape. Let’s walk through every screen.
Onboarding — setting up a shared kitchen
The first time you open CookTwo, you go through a short setup. There are 8-9 steps depending on whether you’re cooking solo or with a partner, and you can skip the body profile and come back to it later.
Step 1 — Welcome
The opening screen is the same whether you’re cooking solo or with a partner. Three buttons at the bottom decide your path.
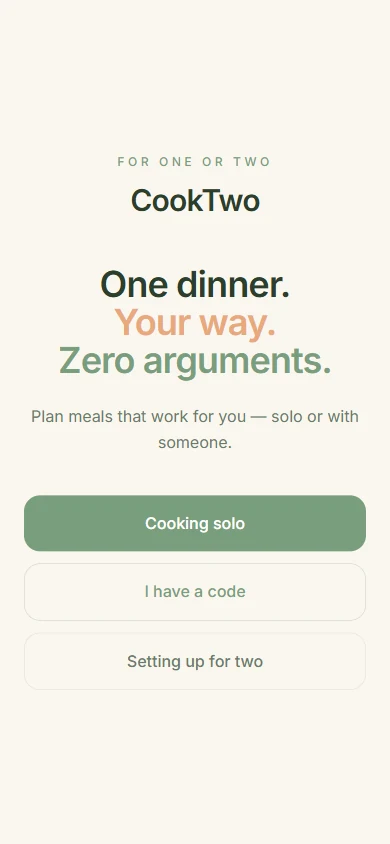
- Cooking solo — sets up a one-person kitchen. You can invite a partner later from the Profiles tab.
- I have a code — for joining a kitchen your partner already started. You’ll enter their 6-digit invite code on the next screen.
- Setting up for two — starts a brand-new household. You’ll get an invite code at the end to share with your partner.
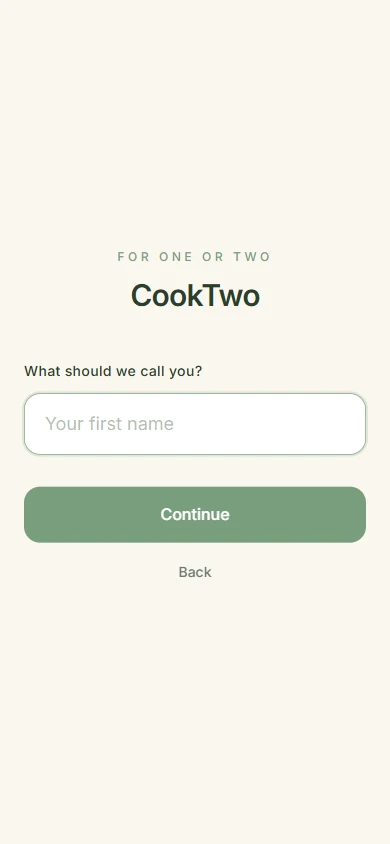
Step 2 — Your name
Type your first name. This is what your partner will see on the partner dot, on notifications, and on the household invite code.
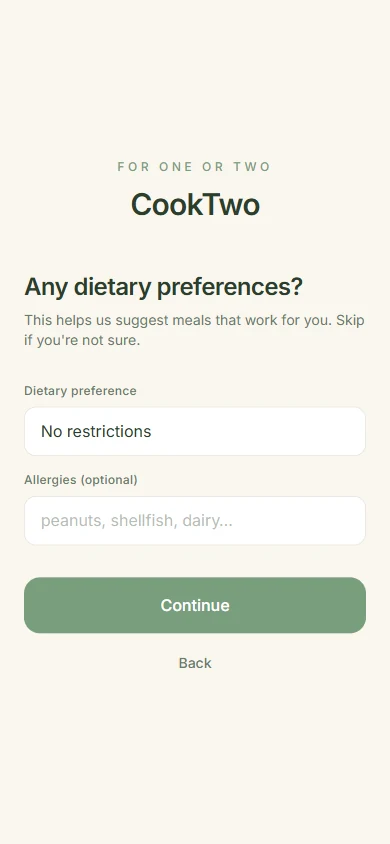
Step 3 — Dietary preferences
Pick your base diet (No restrictions, Vegetarian, Vegan, Pescatarian, Keto, Paleo, Gluten-free) and type any allergies you have. If you don’t know, skip — you can fill this in later.
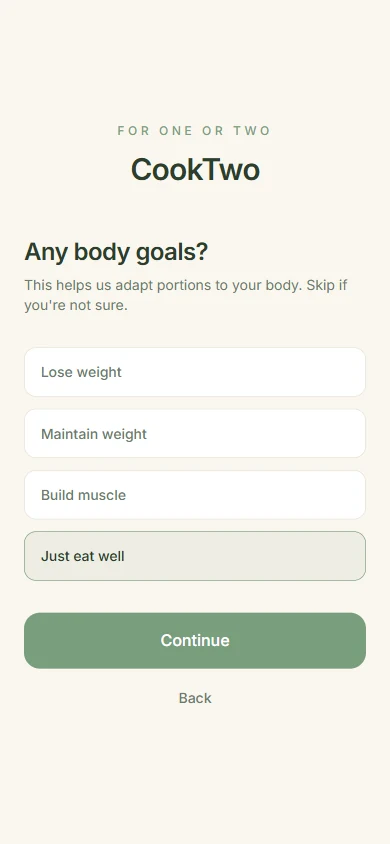
Step 4 — Body goals
What are you working toward? Lose weight, maintain, build muscle, or just eat well. The AI uses this to calculate portion sizes and your daily calorie target.
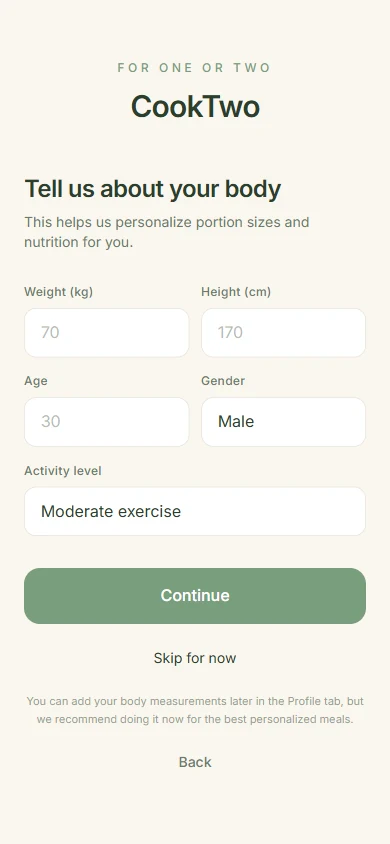
Step 5 — Body profile (optional)
Height, weight, age, gender, and activity level. The app uses these numbers to calculate TDEE (Total Daily Energy Expenditure) — the actual number of calories your body burns in a day — and then subtracts (for weight loss) or adds (for muscle gain) to set your target.
- Weight, height, age, gender — for the Mifflin-St Jeor equation, a resting metabolic rate formula that’s widely regarded as the most accurate for healthy adults.
- Activity level — affects how much your TDEE is. “Sedentary” is desk work, no exercise. “Very active” is hard daily training.
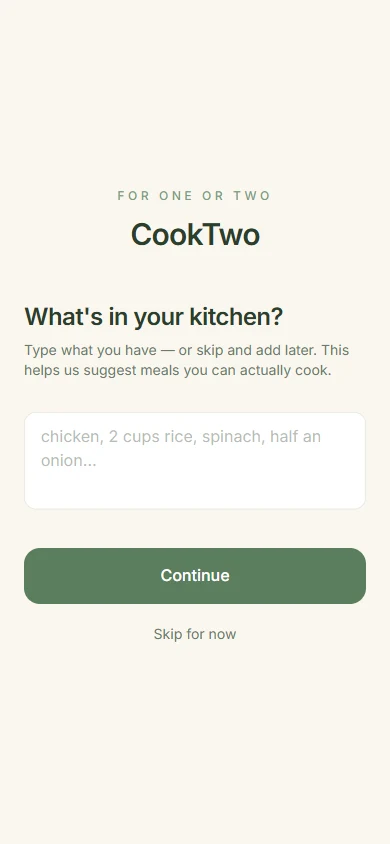
Step 6 — Pantry (optional but recommended)
Just type. Like a sentence. “1L whole milk, 250g swiss cheddar, half an onion, chicken breast, salmon fillets, 2 cups jasmine rice…” — whatever you’ve got in the kitchen. Separate items with commas. The AI parses it into structured items with categories (Produce, Meat, Dairy, Pantry, etc.).
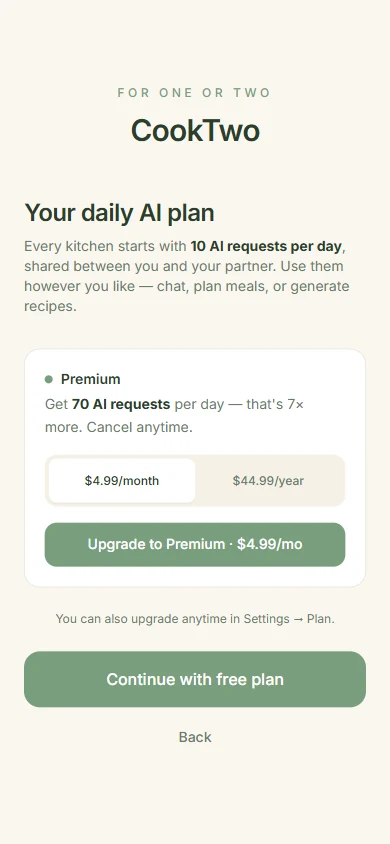
Step 7 — Plan
Choose Free or Premium. Both are full-featured — Premium just gives you 7× more AI requests per day (70 vs 10). You can change this anytime later.
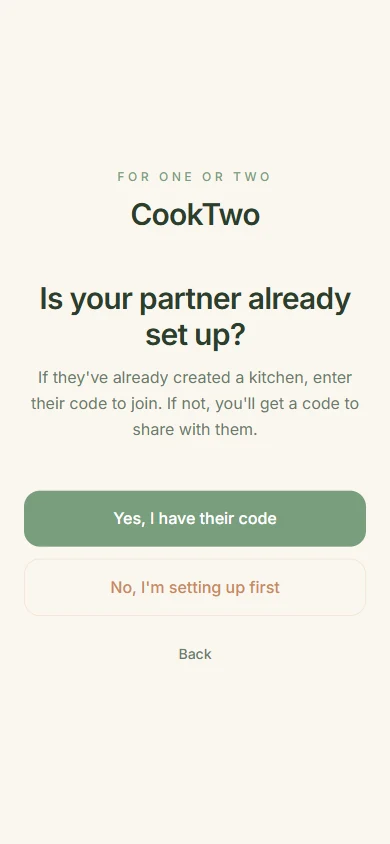
Step 8 — Partner check
If your partner has already set up CookTwo, tap “Yes, I have their code” and enter their 6-digit invite code. If not, tap “No, I’m setting up first” — you’ll get your own 6-digit code to share with them.
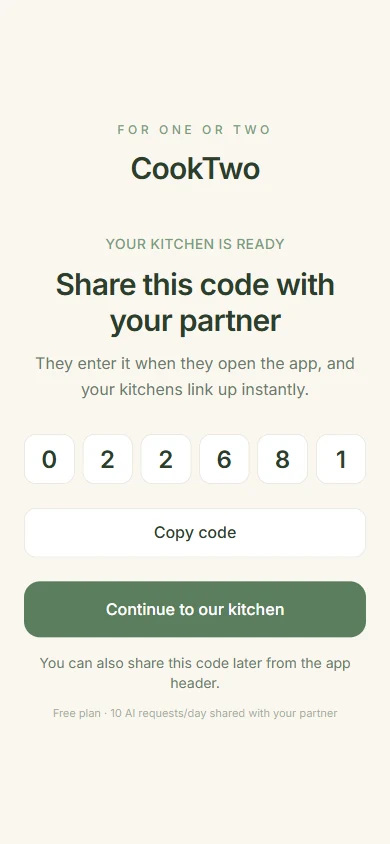
Step 9 — Share your code (or join theirs)
If you set up first, you get a 6-digit invite code. Share it with your partner however you like — text, WhatsApp, email, carrier pigeon. They enter it on their welcome screen and your kitchens link up instantly.
The main shell — header, bottom nav, partner dots
Every screen in CookTwo has the same chrome. Once you know the shell, every tab feels familiar.
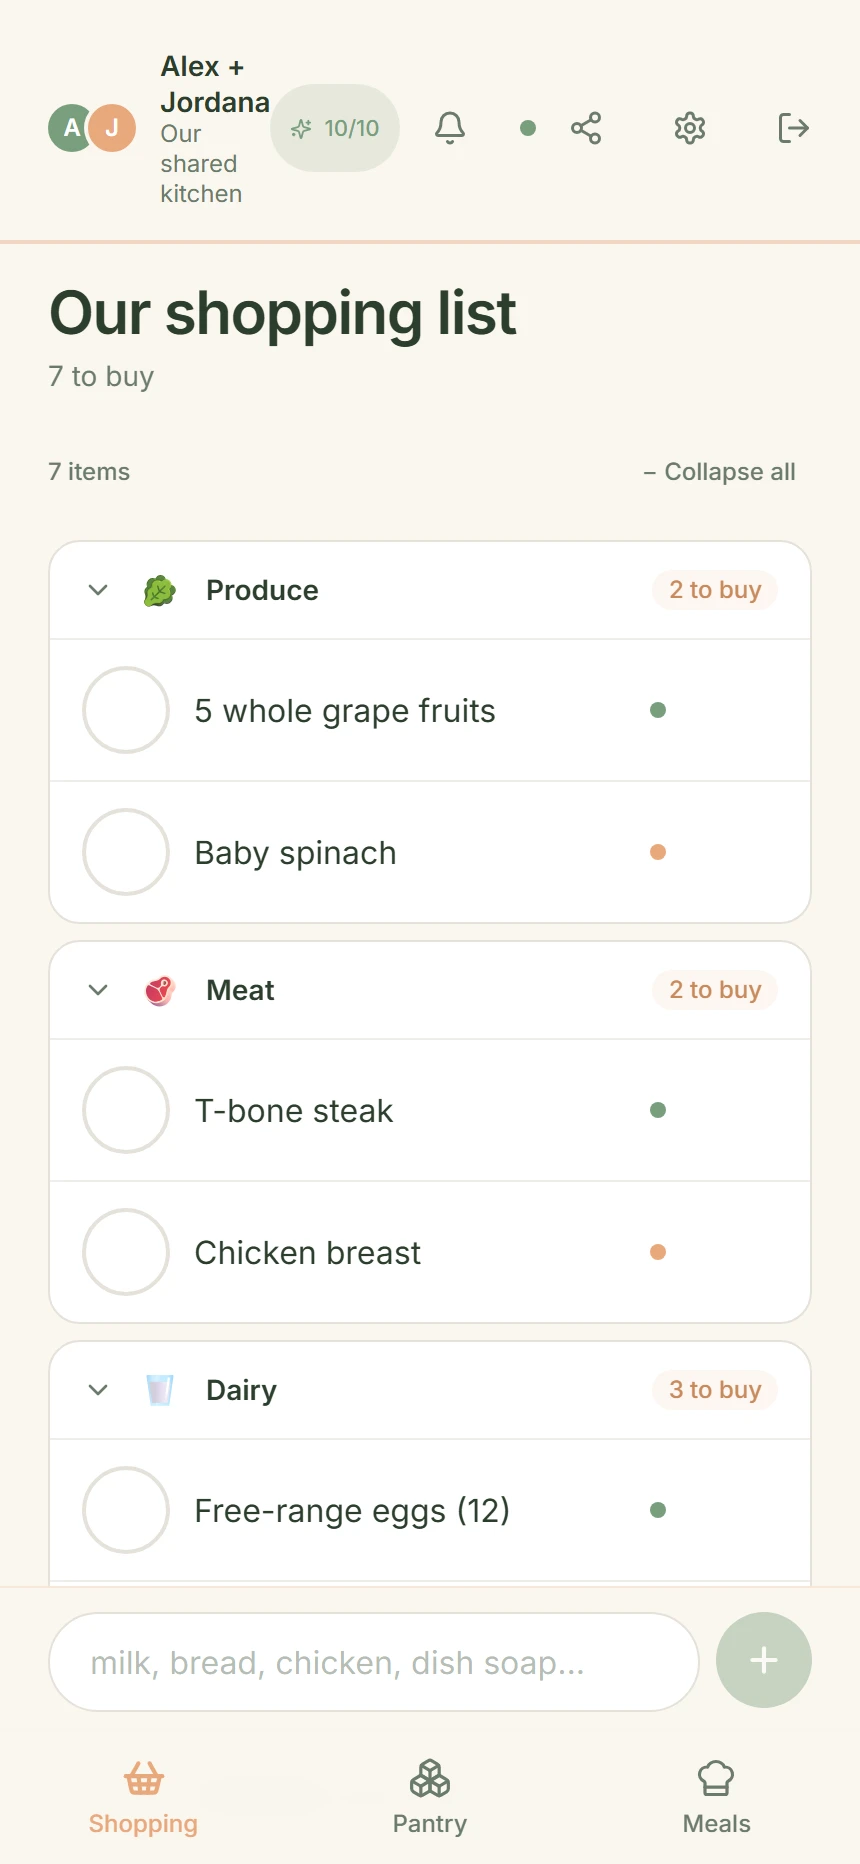
The shell has three parts:
- The header (H) — partner dots and names on the left, six icons on the right. Always there, never scrolls. The partner dots are the small coloured circles with initials: Partner A is sage green, Partner B is terracotta. If you’re cooking solo, you’ll only see one dot.
- The main content — what changes when you switch tabs. Scrolls vertically. On the Shopping tab, the add-item input sits at the bottom of the screen, just above the nav. On the Pantry and Meals tabs, content fills the screen from top to bottom — there’s no fixed input bar at the bottom.
- The bottom nav (N) — three tabs: Shopping, Pantry, and Meals. These are the three primary daily-use tabs. Profiles & Settings live behind the gear icon in the header, not here. Each tab has a small icon and a label. The active tab has a coloured indicator.
The shell is consistent across every tab. Once you learn it, you never have to think about where things are again.
The header bar — every icon explained
The right side of the header has six icons in a row. They do a lot, so they’re worth a closer look.
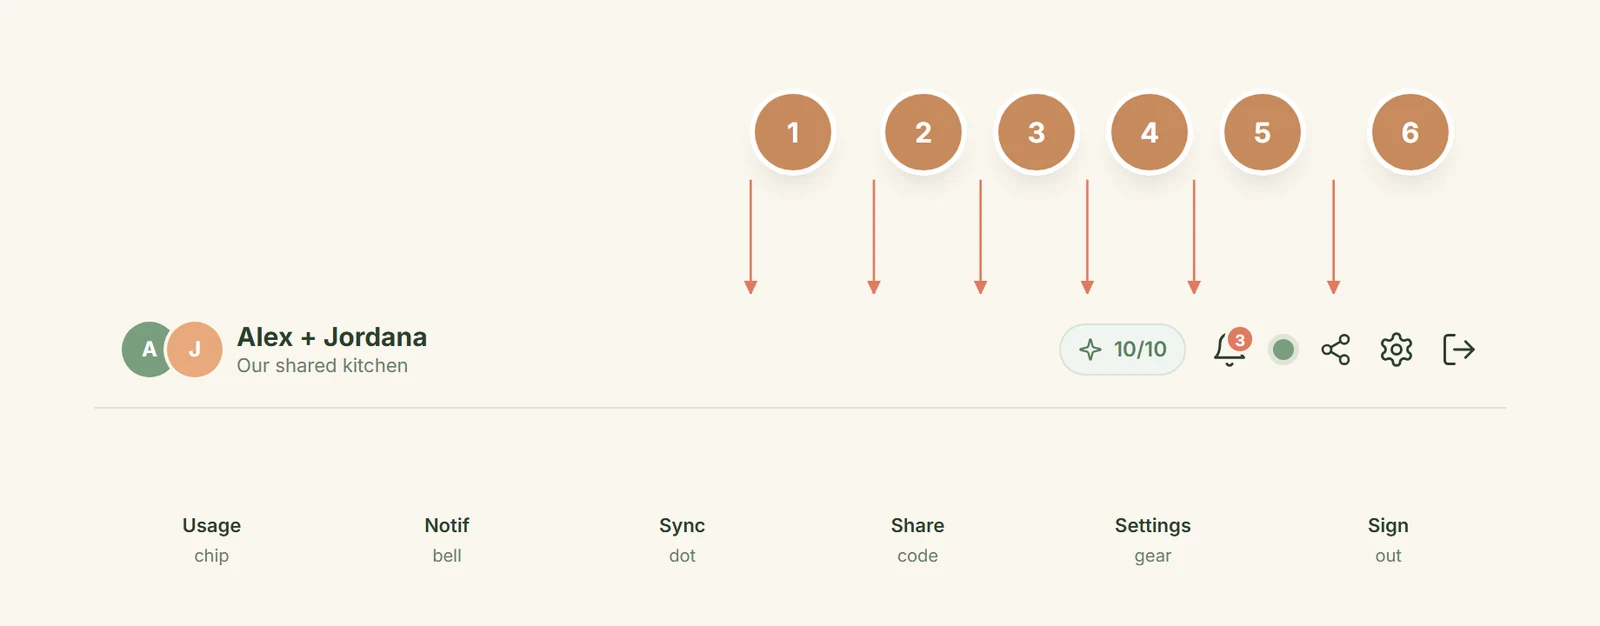
Reading the image left to right:
-
Usage chip — the small pill badge with a sparkles icon showing your remaining AI requests (e.g.
10/10). Tap to see the full usage panel (covered in the AI credits section below). -
Notifications bell — a small red badge shows the unread count. Tap to see every action either of you has taken recently: who added what, who checked what off, who generated a meal. Mark all read at the top.
-
Sync indicator — a small dot. Sage green means connected, amber means reconnecting, red means offline. Changes propagate between you and your partner in under a second when this is green.
-
Share icon — opens the invite-code modal. Use it to re-share your 6-digit code with your partner, or copy the code to text them directly.
-
Gear icon — opens the Profiles & Settings tab (your diet, your goals, your plan, link a partner, etc.).
-
Sign out icon — the door/exit icon on the far right. Logs you out and sends you back to onboarding.
The header never scrolls with the page. It stays glued to the top.
The Shopping tab
The Shopping tab is where most of your day-to-day lives. It’s a real-time, partner-coloured, AI-categorised grocery list.
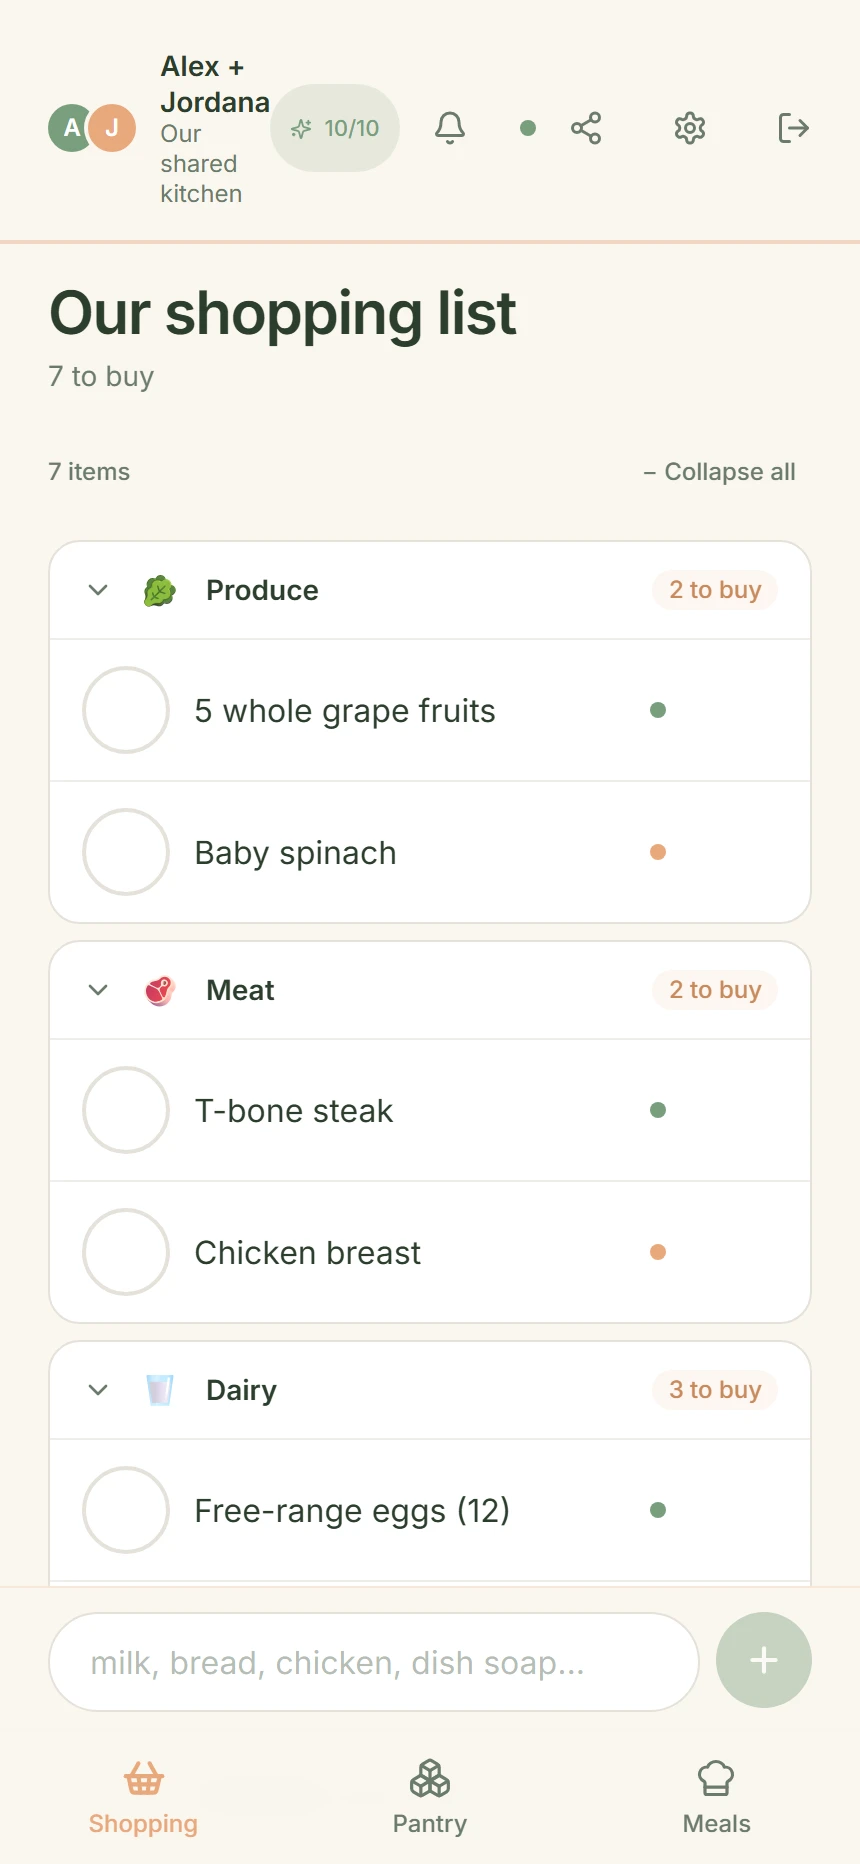
Here’s what you’re seeing:
- Title with item count — the header shows how many items are left to buy.
- Category cards (C) — Produce, Meat, Dairy, Pantry, Household, Personal Care. Each category is a collapsible card. A single tag on the right (
2 to buy,1 to buy,done) shows how many unchecked items are in that category. Tap the category header to collapse it. Inside each card, every item has:- A checkbox — tap to check off
- Quantity in parens (e.g. “Chicken Breast 500g”)
- A partner dot on the right (sage for Partner A, terracotta for Partner B) — shows who added it
- A small × on hover (or tap-and-hold on mobile) to delete
- A move action — tap to re-file the item into a different category if it landed in the wrong one
- Add input — type more items. Commas separate them.
The AI sorts your items into categories automatically based on the item name. “Sourdough bread” goes to Pantry. “Chicken breast” goes to Meat. “Baby spinach” goes to Produce. If something ends up in the wrong category, the move action lets you fix it in one tap.
Checking items off and the “Done shopping” flow
As you walk through the supermarket, you tap each item to check it off. Checked items move to the bottom of their category, with a strikethrough.
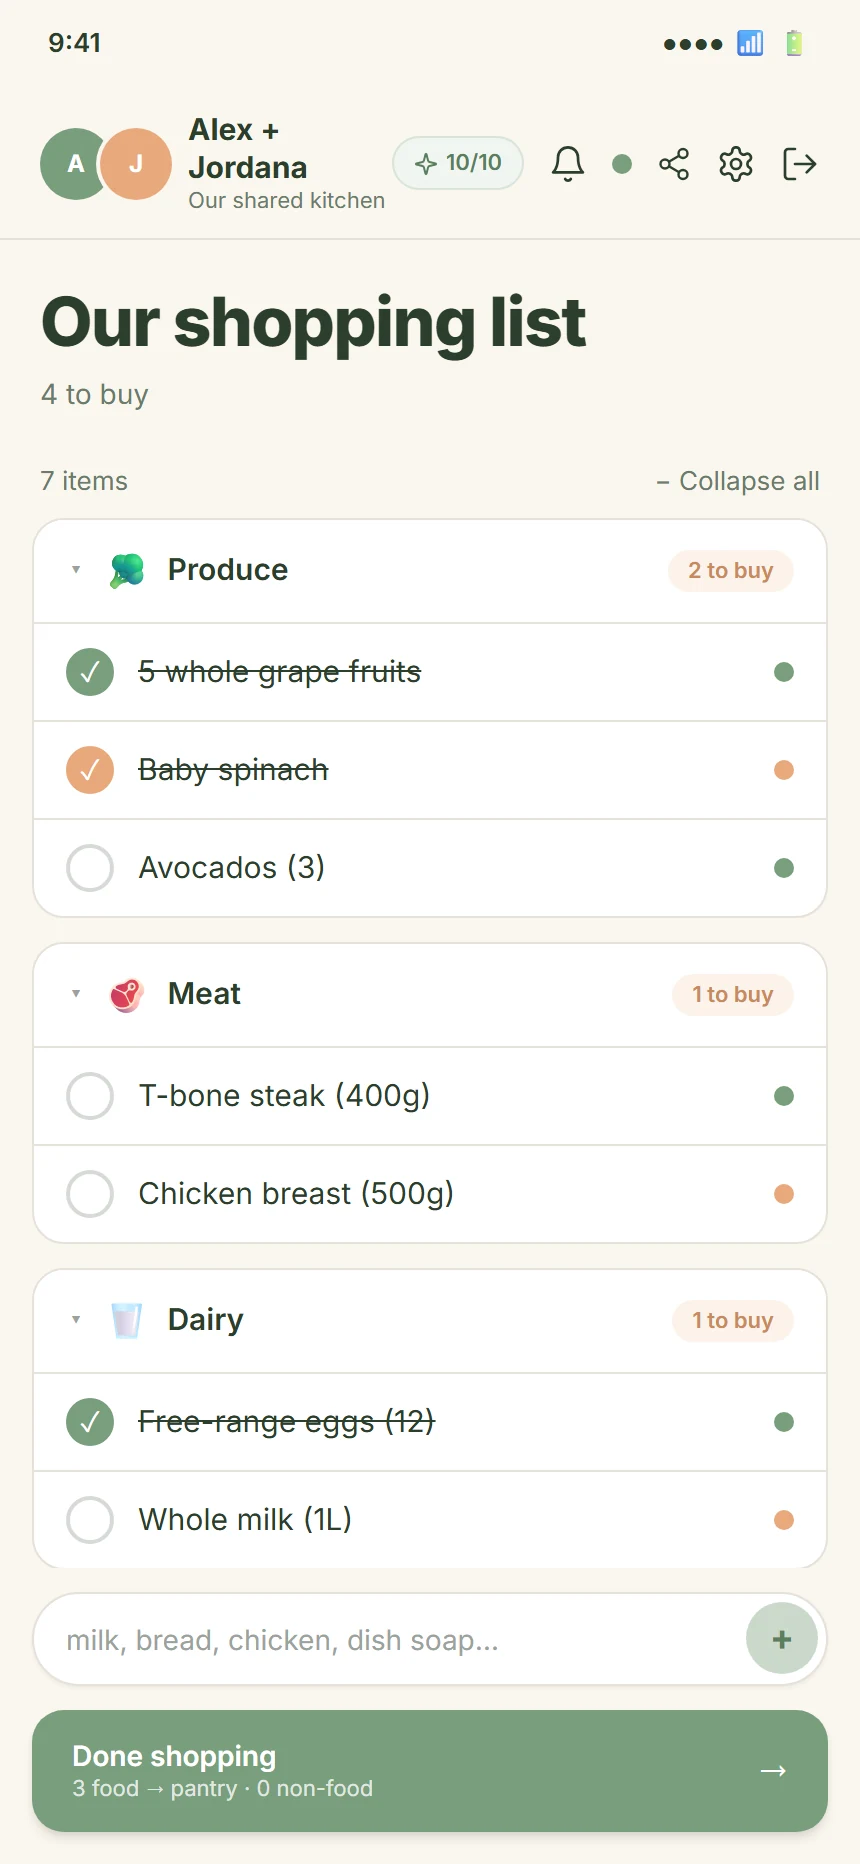
When you’ve checked everything off and you’re ready to put the groceries away, tap the big Done shopping button at the bottom. It’s smart about what it does:
- Food items you checked off get moved to your Pantry automatically (so you don’t have to type them in again).
- Non-food items (dish soap, toothpaste, etc.) just get removed from the list.
The button tells you exactly what’s going to happen: “Done shopping · 2 food items → pantry · 1 non-food removed”.
The Pantry tab
The Pantry is your “what’s in the kitchen right now” list. It feeds the AI meal planner — meals are built around what’s already in your pantry before adding anything new.
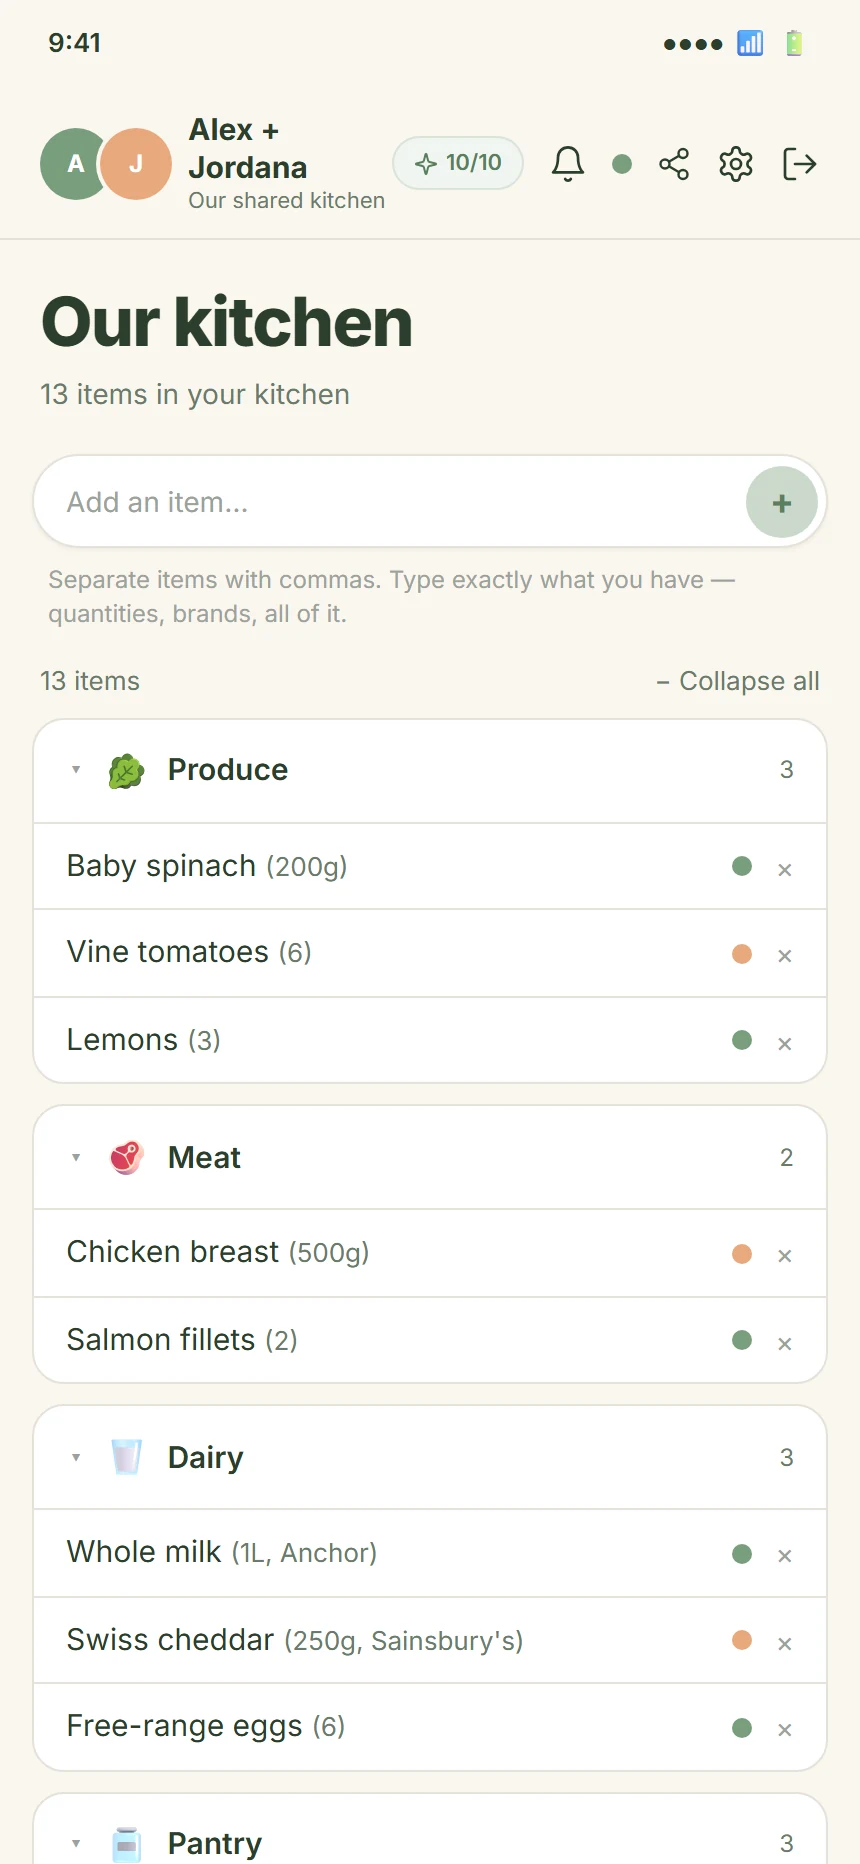
The Pantry uses the same category emojis as the Shopping list: 🥬 Produce, 🥩 Meat, 🥛 Dairy, 🫙 Pantry, 🏠 Household, 🧴 Personal Care. Each category is a collapsible card. Inside each card, items have:
- Quantity and brand in parens (e.g. “1L Whole Milk”, “Swiss Cheddar (250g, Sainsbury’s)”)
- A partner dot on the right
- A small × to delete the item
The top-right of the list has + Expand all / − Collapse all. Useful when you have a long list.
The Meals tab — Tonight and Saved
The Meals tab is the AI planner. It has two views in a pill switcher at the top: Tonight and Saved.
Tonight — empty state
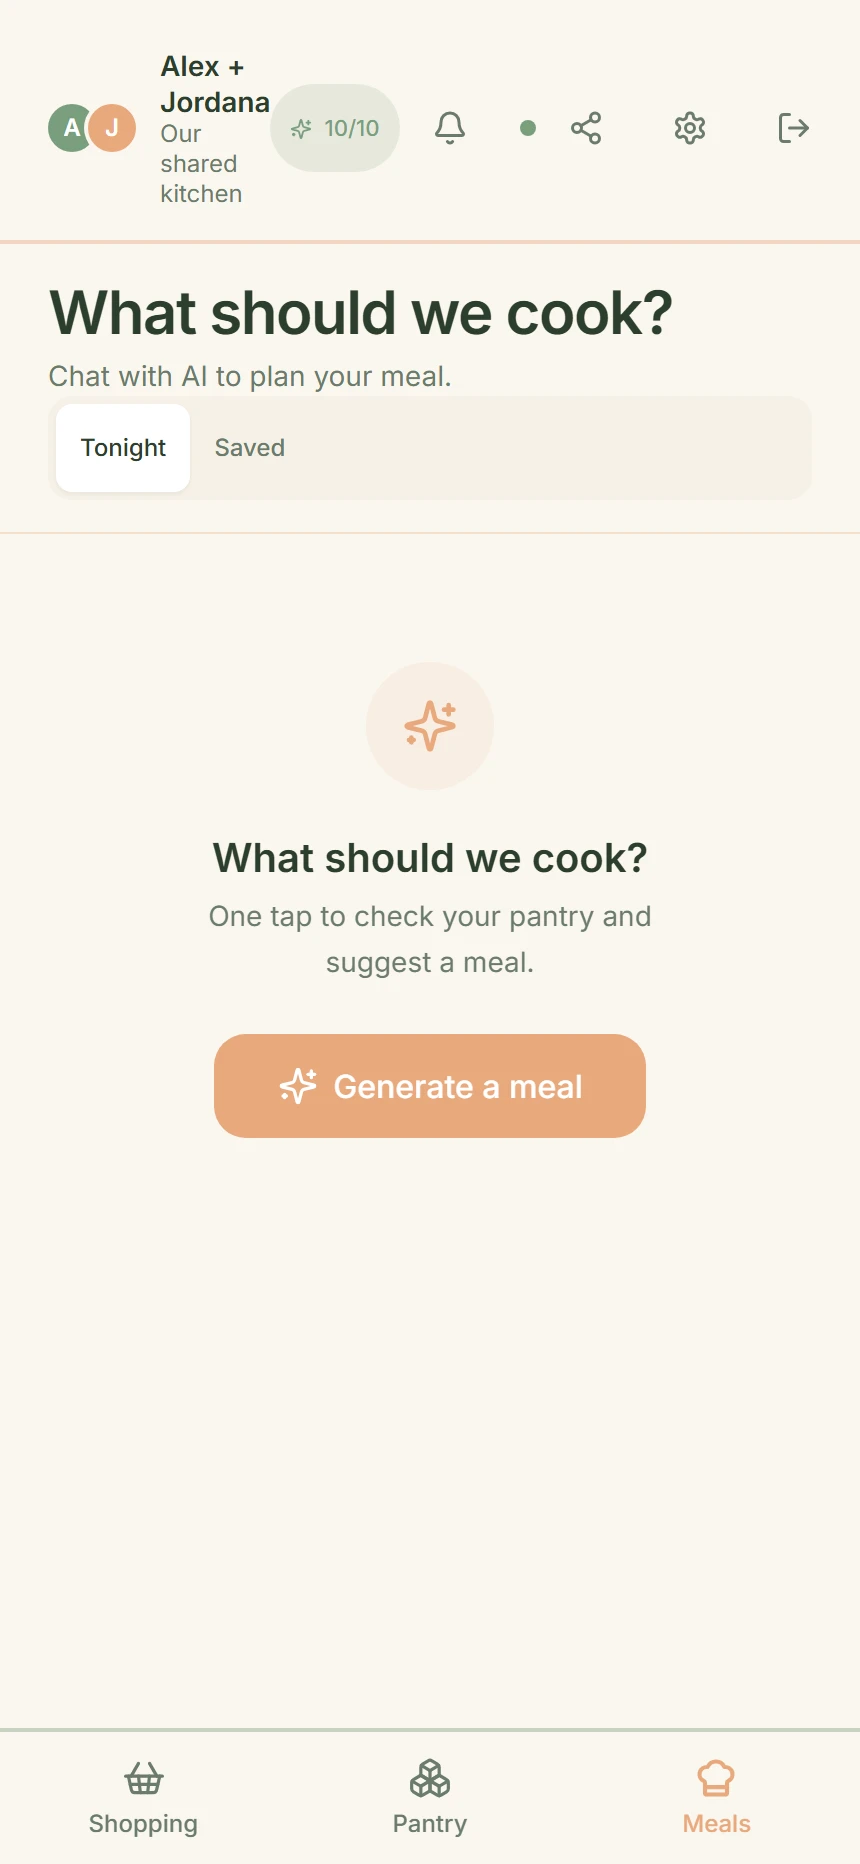
The first time you open the Meals tab, you see a single button: Generate a meal from what’s in your pantry. This is the default — the AI looks at your pantry and suggests a meal you can cook tonight without going to the shop. Tap it.
You’ll also see a second option:
- Suggest a meal — I’ll shop — plans a meal based on what you’d like, and adds any missing ingredients to your shopping list.
The chat interface below the buttons is where the conversation happens. You can type follow-up questions like “what can I substitute for chicken?” or “make it vegetarian” — and the AI will adjust the suggestion. Every interaction in this chat counts as one AI request against your daily quota.
Tonight — the meal card
After you pick a mode, the AI responds with a chat-style message and a meal card.
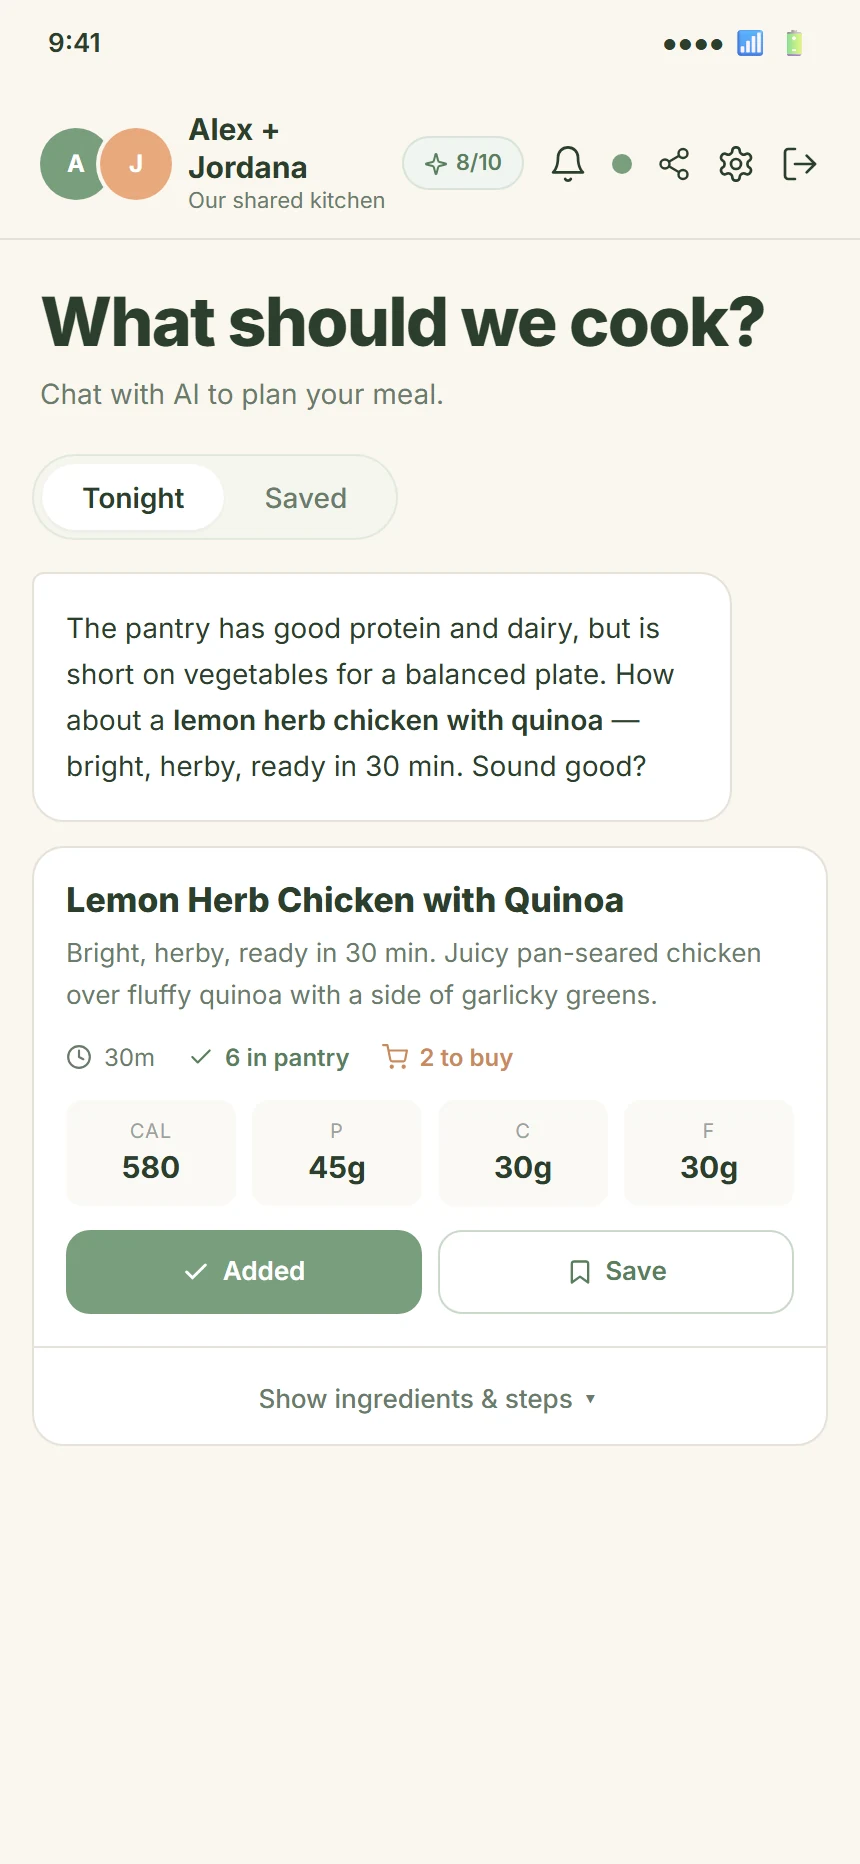
The meal card has:
- Name and description — e.g. “Lemon Herb Chicken with Quinoa — bright, herby, ready in 30 min.”
- Time — total time in minutes.
- In pantry / To buy — how many ingredients you already have, how many you need.
- Macros — four small stats: calories, protein, carbs, fat (per plate by default).
- Action buttons:
- Add X to list — add the missing ingredients to your shopping list. Turns green and says “Added” after you tap.
- Save — saves the recipe to your Saved list.
Tap Show ingredients & steps to expand the full recipe.
Tonight — adaptive plating (the magic part)
This is the bit that makes CookTwo different from any other meal planner. When both partners have set their goals and body profiles, the AI sizes the same recipe into two different plates — one for each of you. Same pan, two portions.
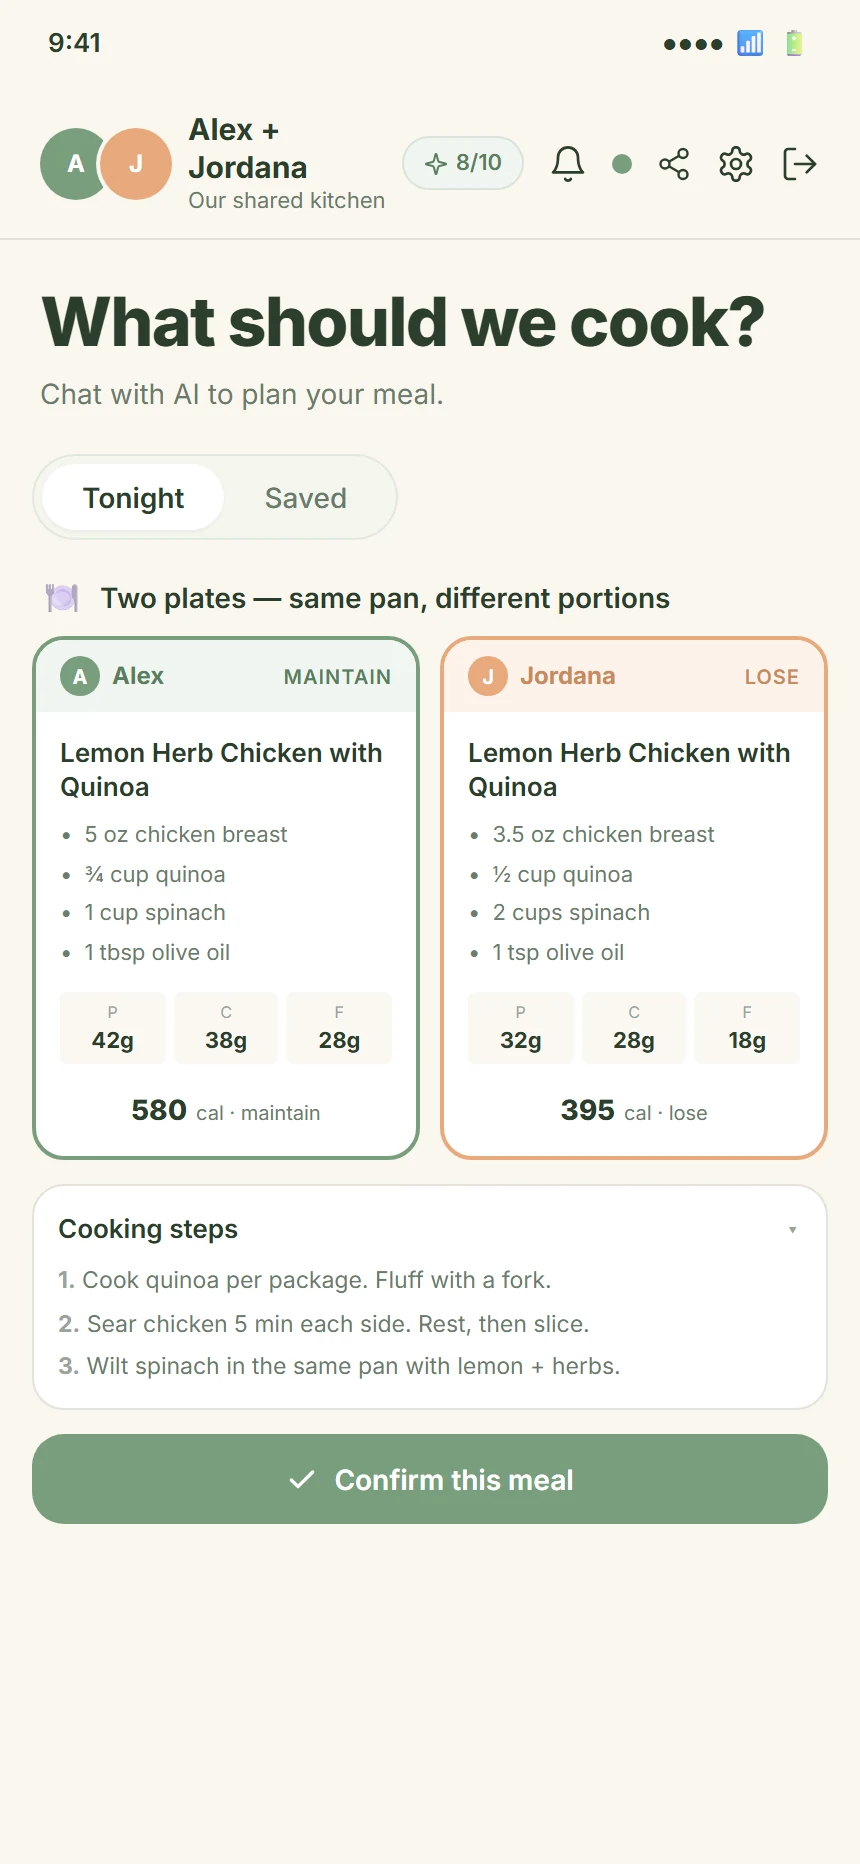
There are two cards side by side. Each one shows:
- Whose plate — Partner A (sage border) or Partner B (terracotta border).
- The portion — exact amounts in real units (e.g. “6oz chicken, 1 cup quinoa, side of greens”).
- Macros — protein, carbs, fat for that plate.
- The total — calories and the goal it serves (e.g. “~700 cal · Muscle gain”).
The cooking steps are the same for both of you. You cook one pan. At the end, you plate it differently.
Saved recipes
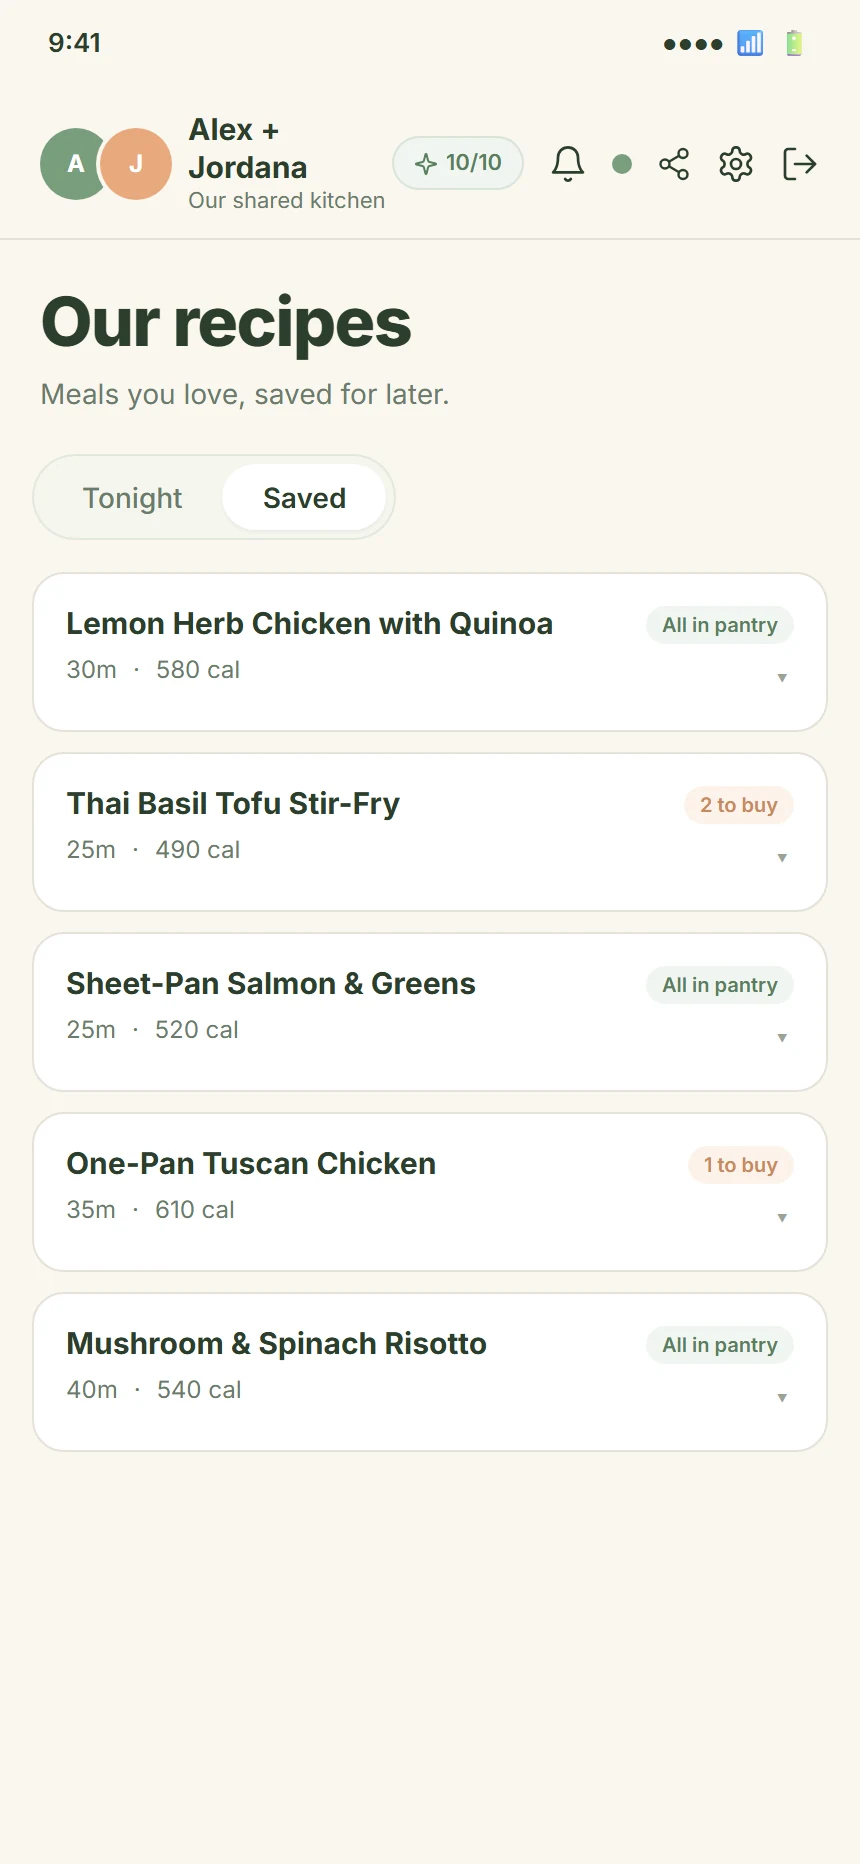
When you save a meal from the Tonight card, it shows up in the Saved view. Saved recipes remember their ingredients, steps, and plating. The status badge on the right tells you whether you can cook it right now (in pantry) or need to shop first (X to buy).
Tap any saved recipe to expand it and see the full details again — ingredients, steps, and plating cards for both partners. You can also tap Add X to list right from the saved view to restock the ingredients you’re missing.
Saved recipes are unlimited on both Free and Premium plans. There’s no cap on how many you can save.
The Profiles & Settings tab
Reached via the gear icon in the header. This is where your diet, body profile, and plan live.
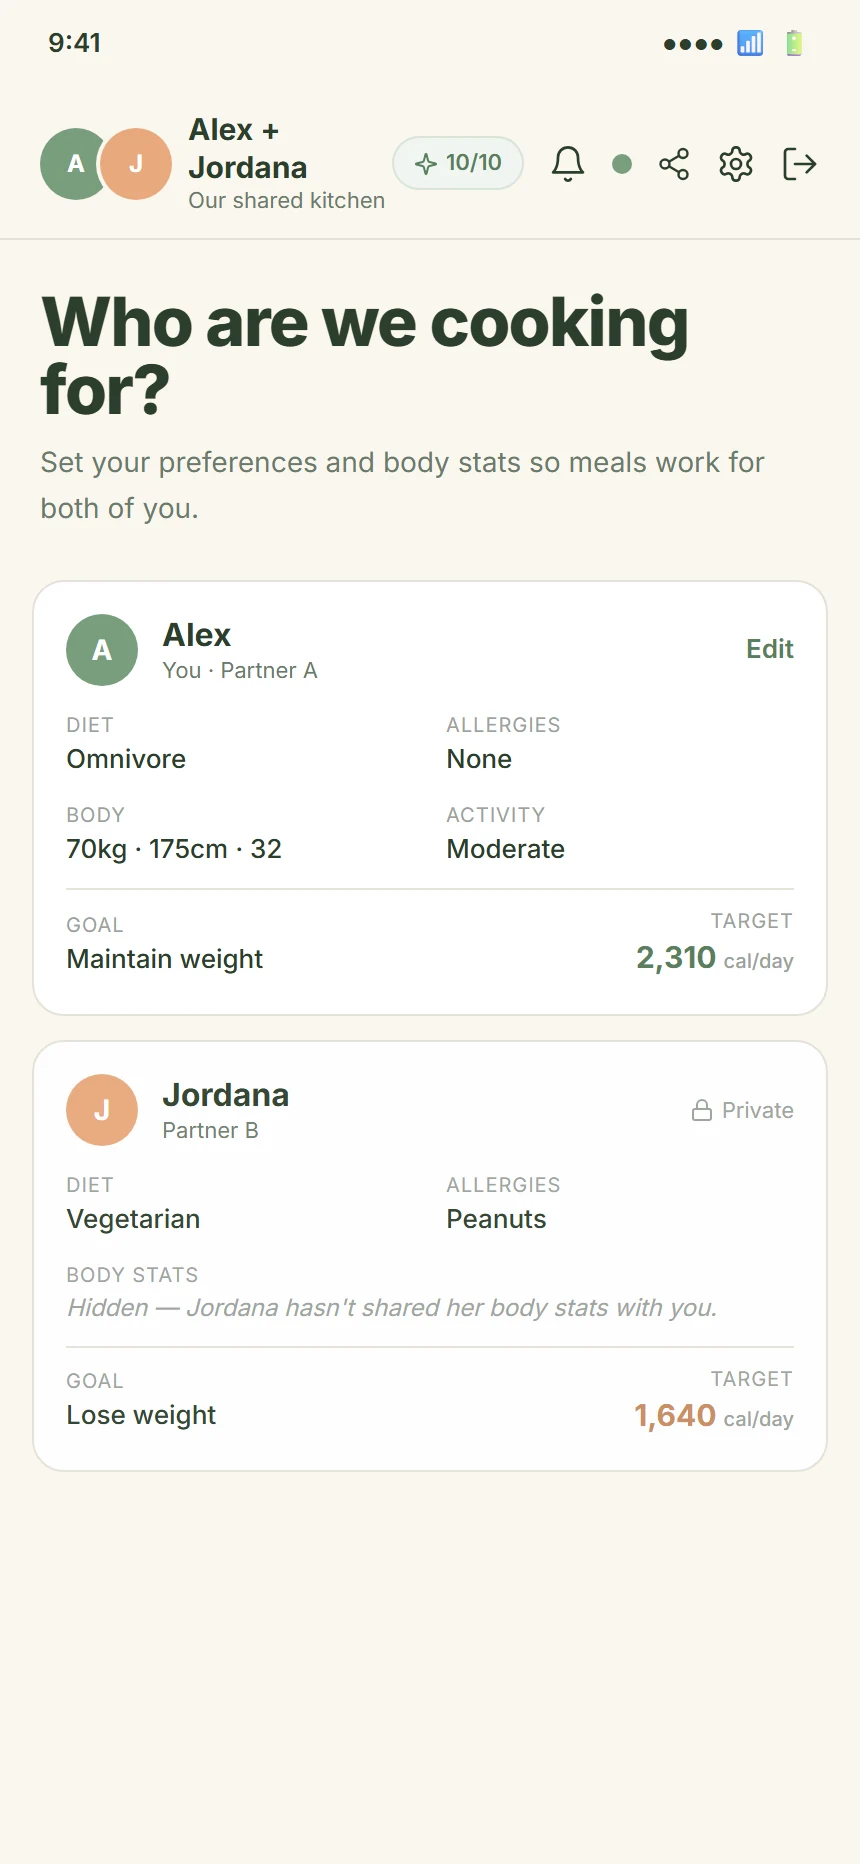
Each profile card shows:
- Name and the small partner dot
- Diet — what dietary pattern you’re on
- Allergies — the comma-separated list (or “None”)
- Body profile — weight, height, age, gender, activity level
- Goal + target — what you’re working toward, and your daily calorie target (TDEE-based)
Tap Edit on your own card to change anything. Tapping on a field opens an inline form. Save, or Cancel to bail.
Your partner’s profile
The second card on the Profiles tab is your partner’s. By default, you can’t edit it — the body profile is locked to the other partner unless they’ve explicitly opted in by switching on the “Visible to your partner” toggle in their own settings. Only the person whose profile it is can change their body stats, diet, and goals. The meal planner still uses both profiles to calculate plating — it just doesn’t show one partner the other’s numbers unless they’ve chosen to share.
You can see your partner’s name, diet, and allergies on their card. Body stats are hidden by default. If they’ve toggled on visibility, you’ll see their weight, height, age, gender, activity level, and calorie target. The calorie target updates in real time as they change their goal or body stats.
Linking a partner after the fact
If you set up solo and now want to invite someone, scroll to the bottom of the Profiles tab. Tap “Cooking with someone?” to expand the linking section. Your partner sends you their 6-digit invite code, you enter it here, and your kitchens merge.
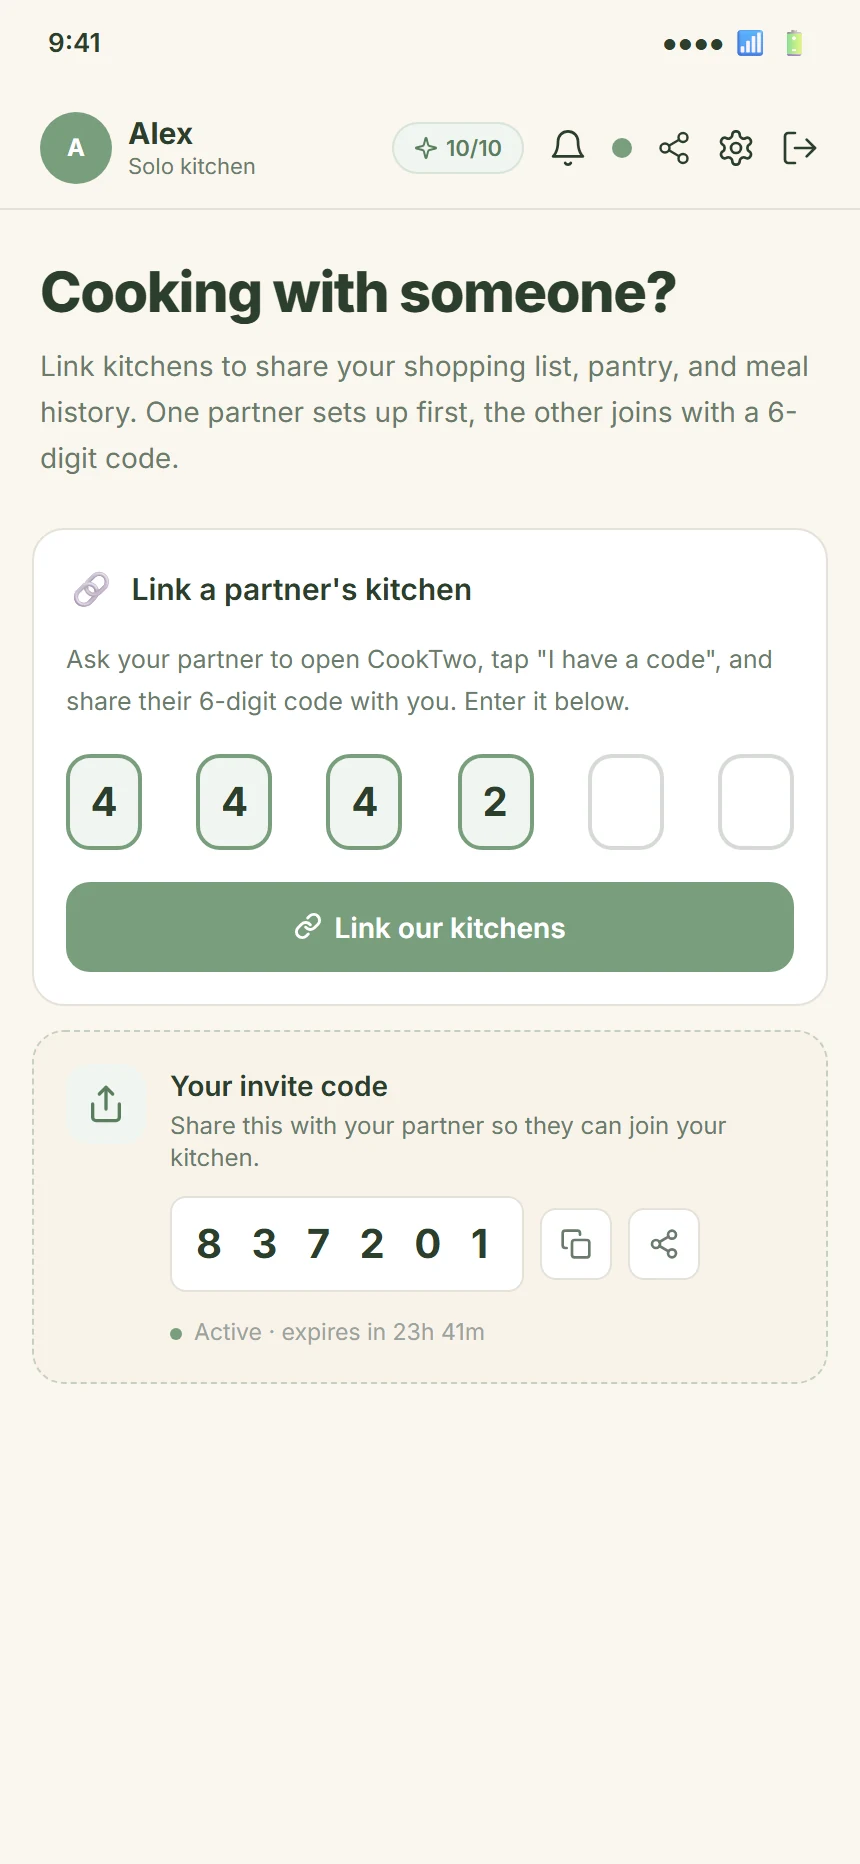
Your partner opens CookTwo, taps “I have a code” on the welcome screen, and gets a code from their own setup. They text you the code, you enter it, and you’re linked. From that moment on, you share the same shopping list, pantry, and meal history. Your profiles stay separate — each of you controls your own diet, goals, and body stats.
The linking section also shows your own 6-digit code, so you can re-share it if your partner hasn’t joined yet. Tap the copy button or use the share icon in the header to send it however you like.
The activity log
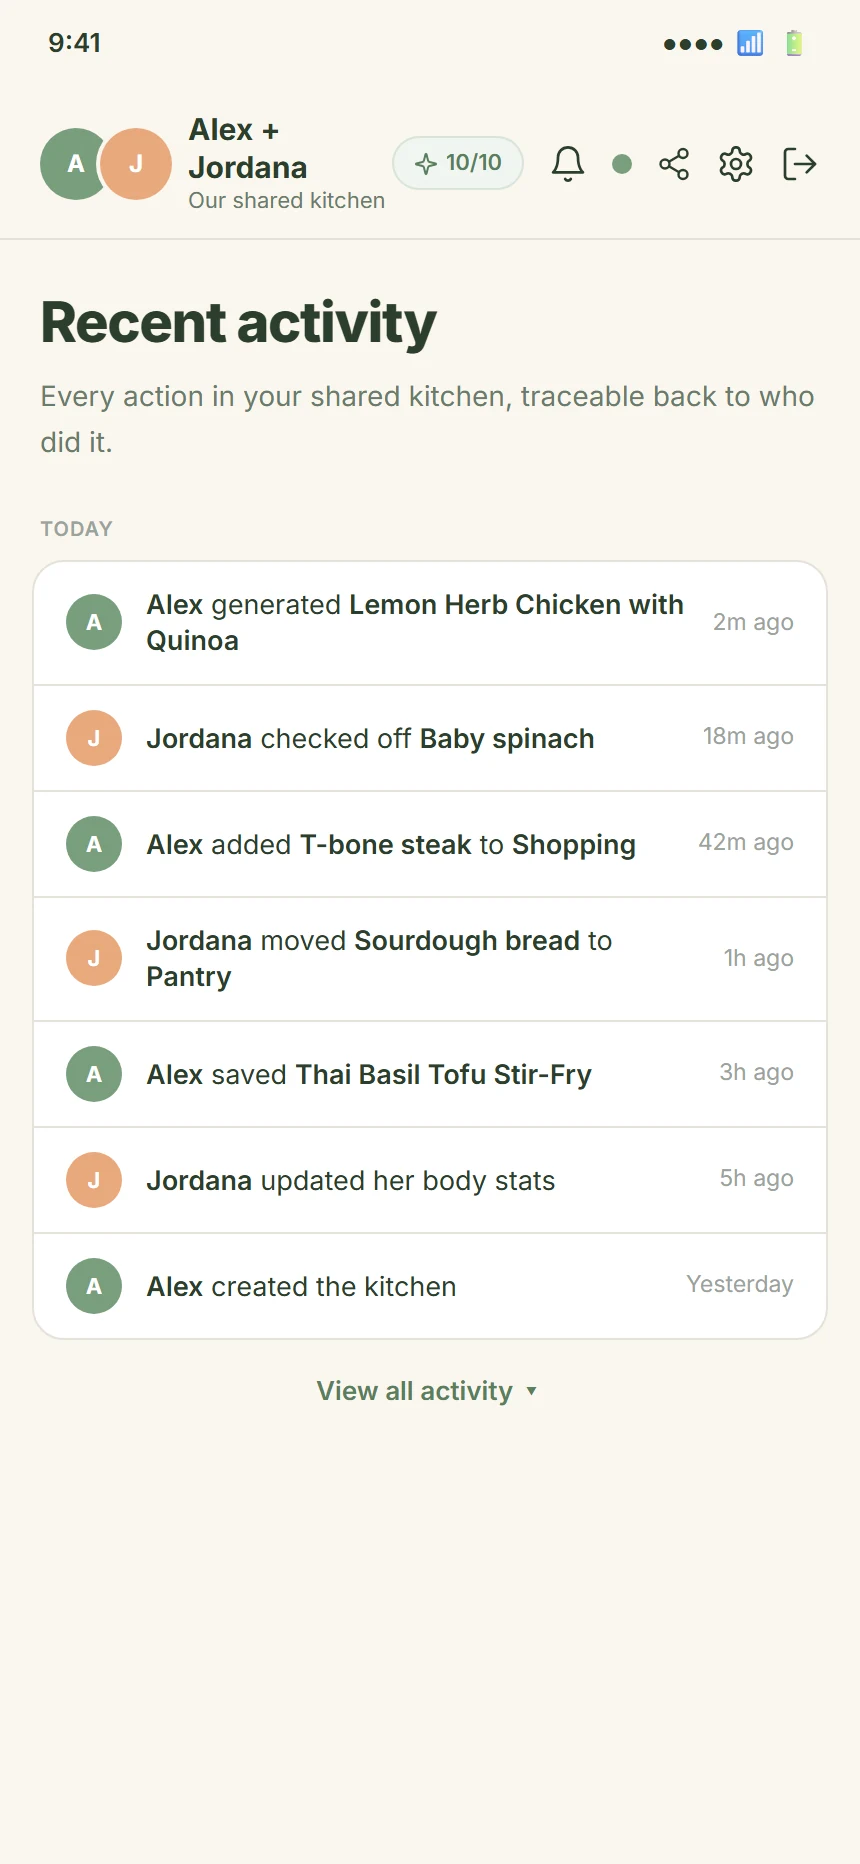
The Profiles tab also has a Recent activity section. This is the long-form version of the notification bell.
Every action is logged: who added what, who checked what off, who moved what to the pantry, who generated a meal, who saved a recipe, who created the kitchen. Each row shows the partner dot, the action, the target item, and a relative timestamp (“2m ago”, “1h ago”, “yesterday”, etc.).
AI credits and the free vs Premium tiers
The AI is metered. The whole app runs on a daily quota that resets at midnight in your local timezone. The quota is shared with your partner — you don’t get two separate limits, you get one shared pool.
The chip in the header
The pill badge in the header (the 10/10 thing) is your live usage. Tap it to open the full panel.
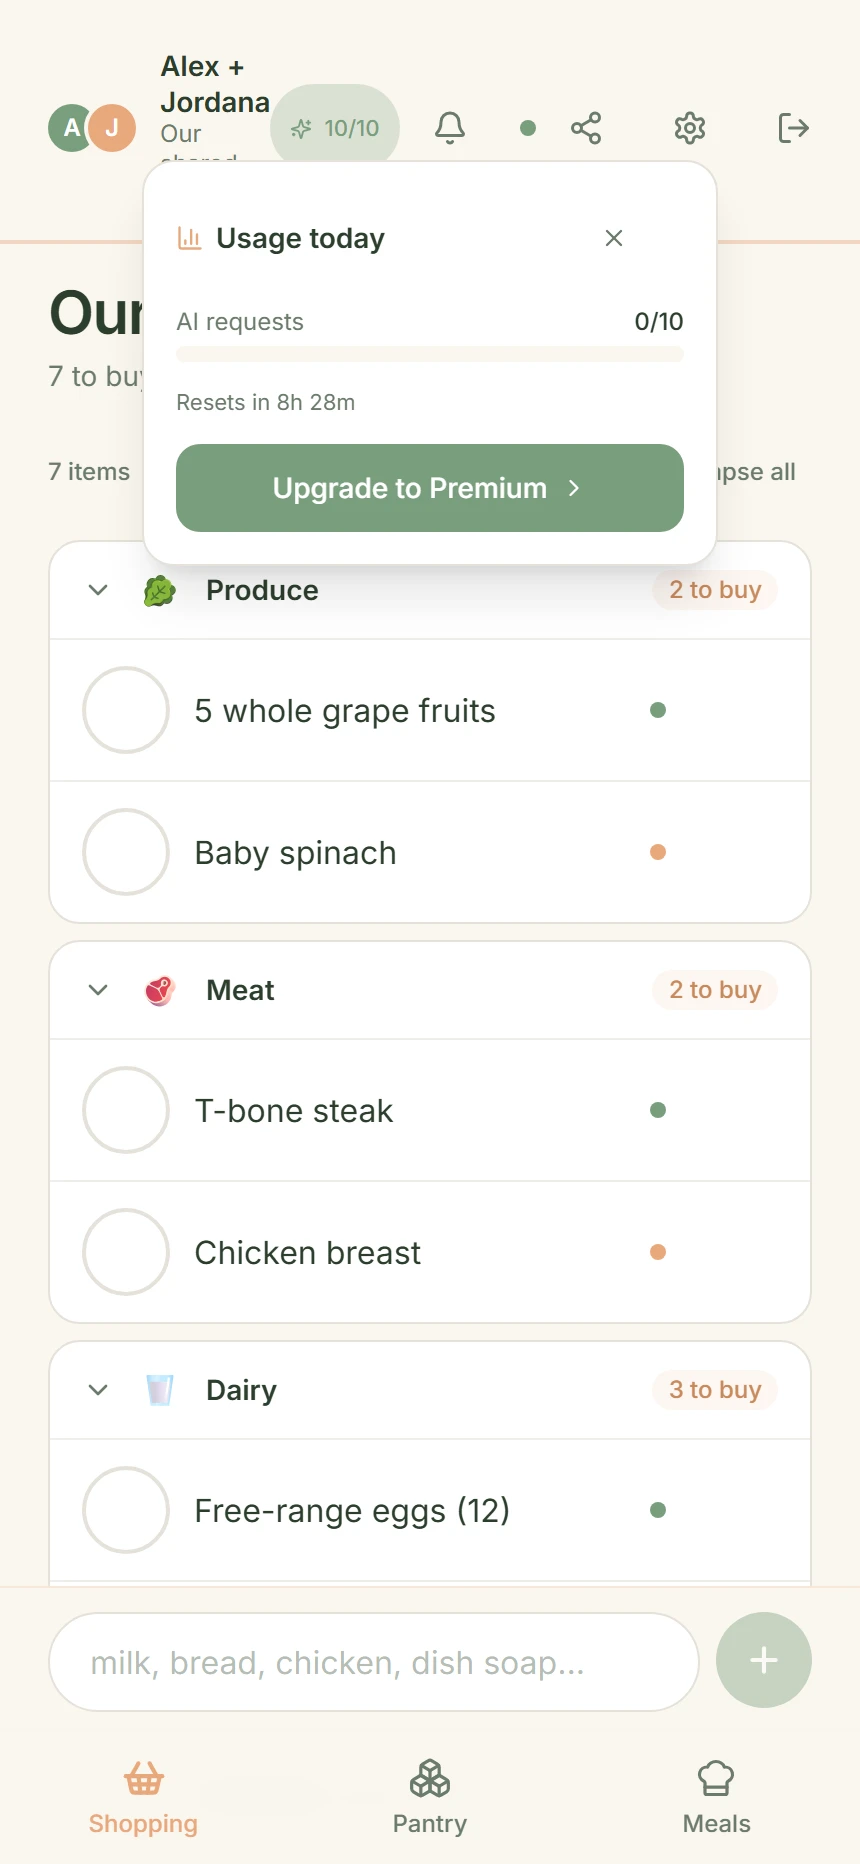
The panel shows:
- AI requests —
4/10used today, with a progress bar that goes sage → amber → terracotta as you burn through your quota. - Resets in — countdown to midnight in your timezone, when the quota resets.
The chip color changes as you get closer to your limit:
- Sage (0–49% used) — you’re fine
- Amber (50–79% used) — getting close
- Terracotta (80–100% used) — almost out, the panel opens to the upgrade prompt
The quota is shared between you and your partner. If you generate a meal, it counts against the same pool. If your partner generates one, that counts too. You’re working from a single daily budget.
The two plans side by side
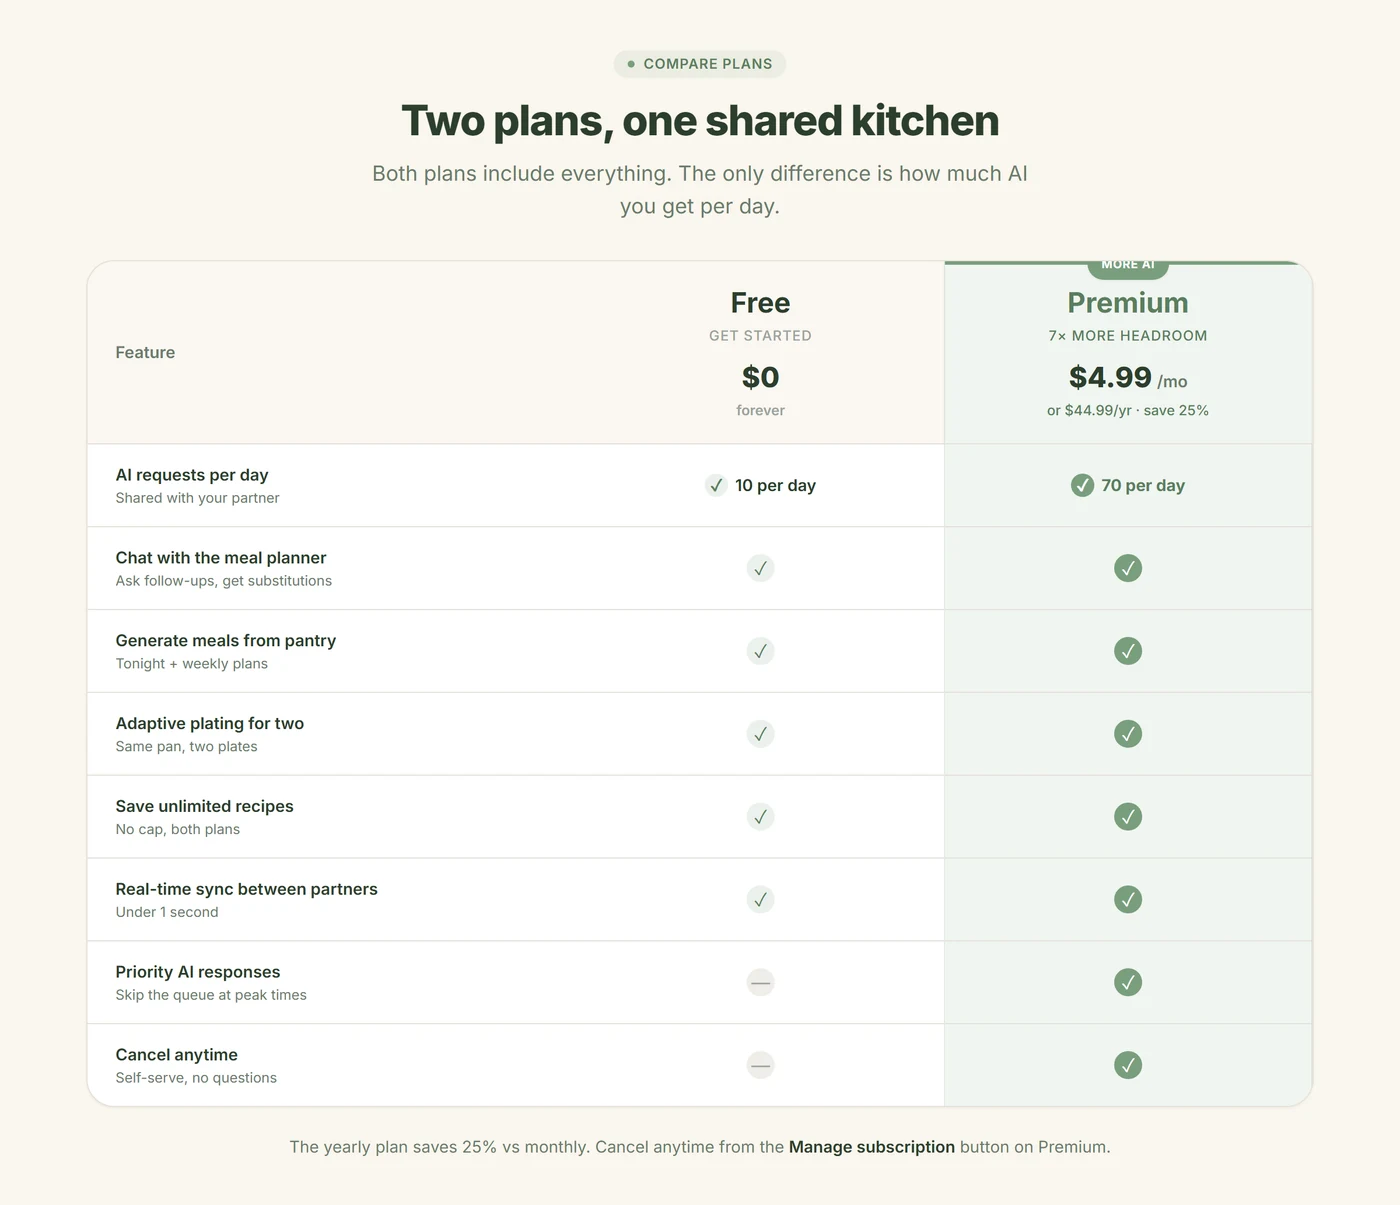
The yearly plan saves 25% vs monthly. Cancel anytime from the Manage subscription button (Premium only) — it opens a Stripe portal where you can cancel, change cards, or download invoices.
Notifications, sharing, offline, and signing out
A few last screens worth knowing about.
Notifications bell
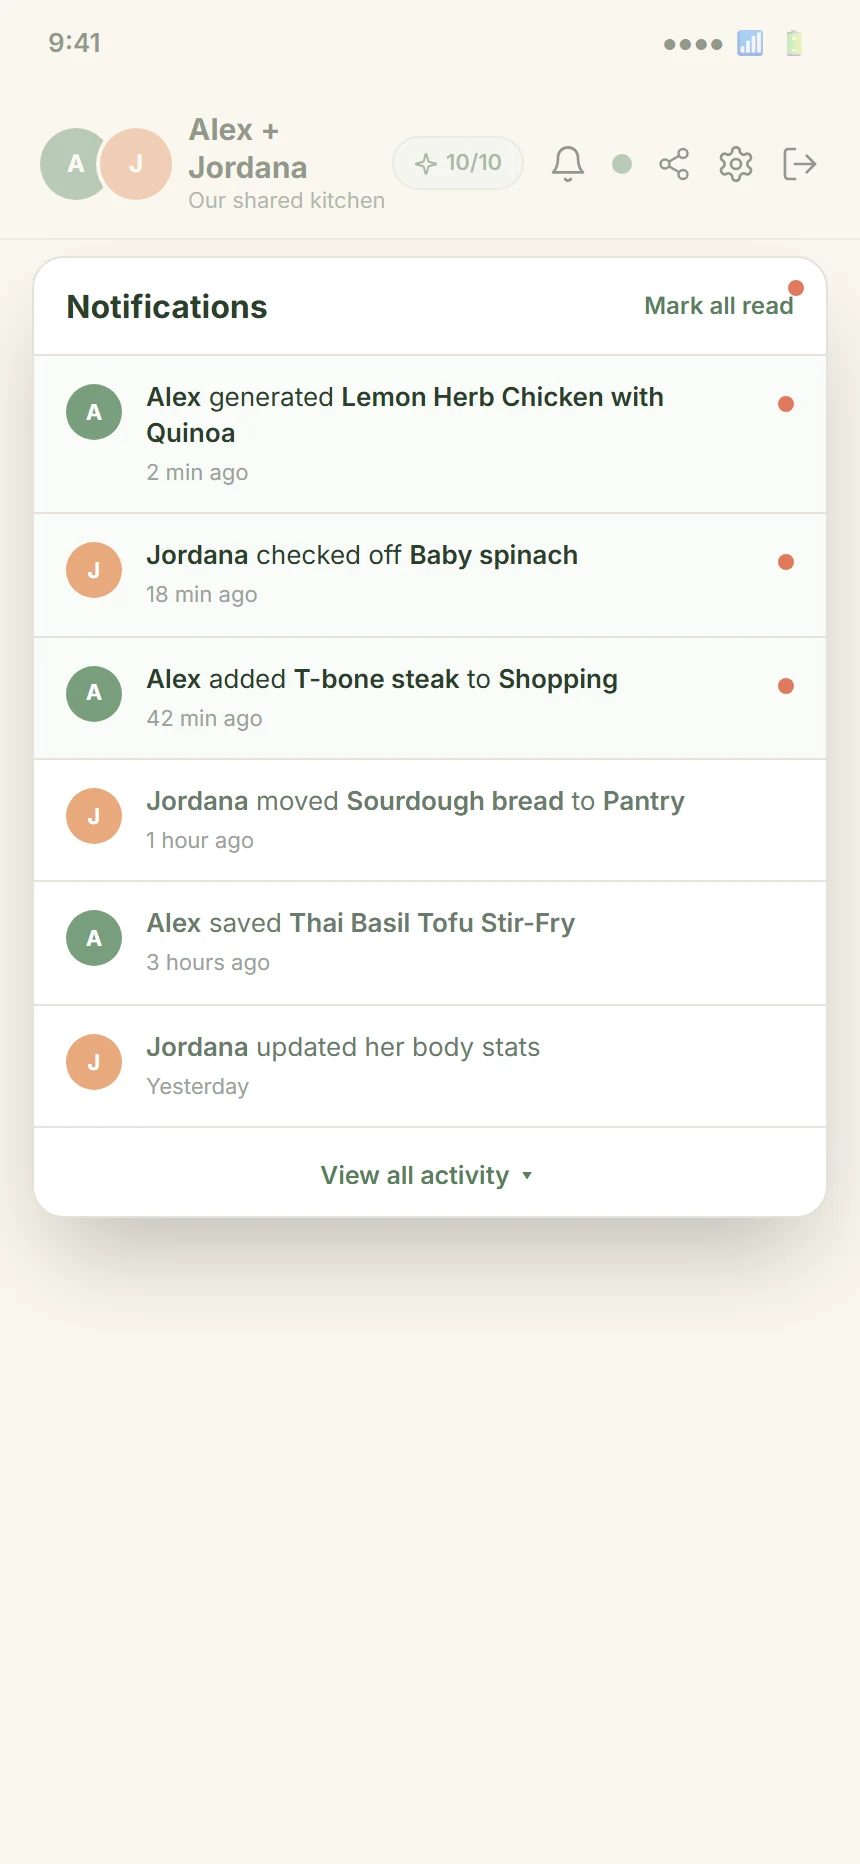
Tap the bell icon in the header to see the last 20 actions either of you has taken. Unread items have a sage background and a small red dot. Tap Mark all read at the top to clear them.
Each notification shows the partner dot, the action, and the target item. Examples: “Partner A added Chicken Breast to Shopping”, “Partner B checked off Jasmine Rice”, “Partner A generated a meal”. It’s a running log of everything happening in your shared kitchen.
Share the invite code
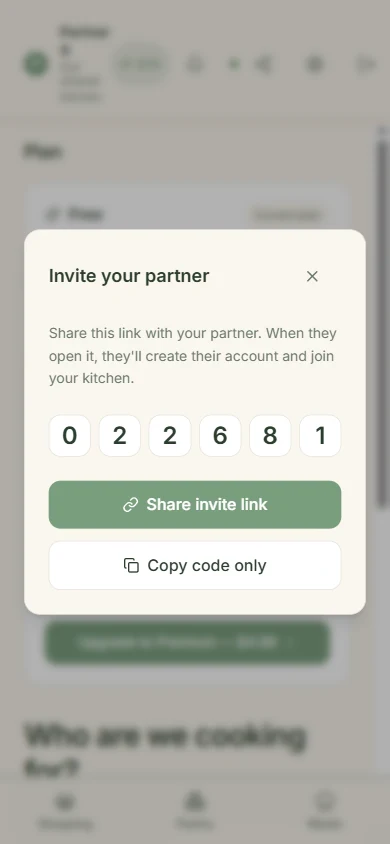
Tap the share icon in the header. You get two options:
- Share invite link — opens your phone’s native share sheet (iMessage, WhatsApp, email, whatever). The link is
cooktwo.com/join?c=XXXXXX. When your partner taps it, the app opens, drops them into onboarding with the code pre-filled. - Copy code only — just the 6 digits, ready to paste anywhere.
This is the same code you got at the end of onboarding. Use it whenever you need to re-share — if your partner gets a new phone, if they accidentally signed out, or if you just haven’t sent it yet.
Upgrade to Premium
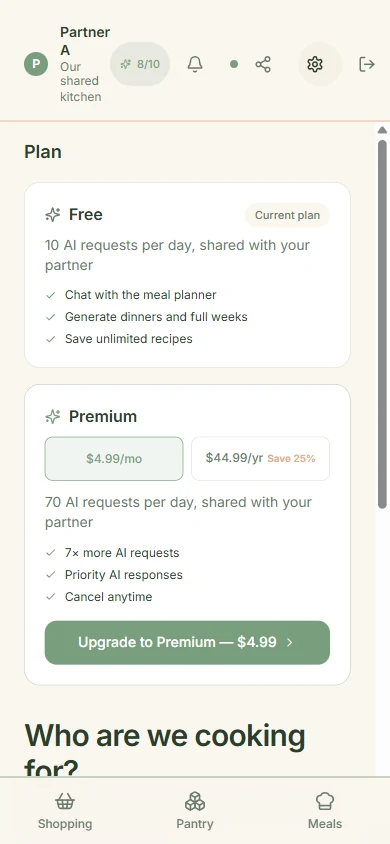
The upgrade view shows both plans side by side, with the upgrade CTA on the Premium column. You can pay monthly ($4.99) or yearly ($44.99 — saves 25%). Payment is handled by Stripe. Cancel anytime from the Manage subscription button.
Offline mode
If you lose signal — in a basement supermarket, on a plane, in a tunnel — the app keeps working.
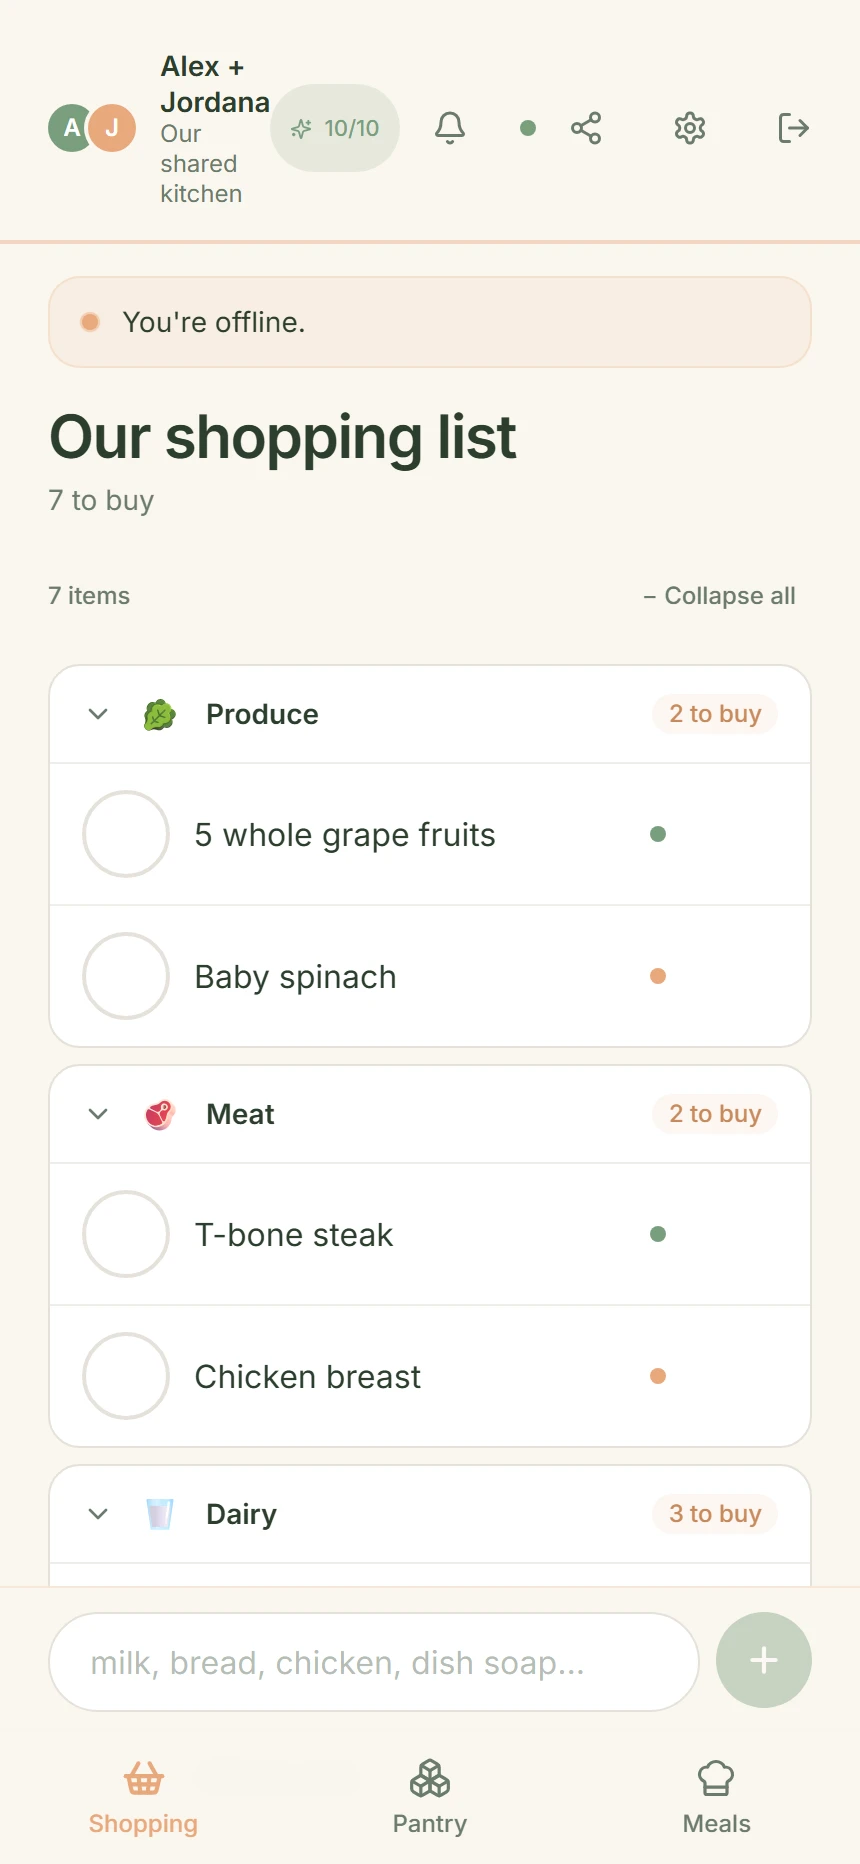
A terracotta banner appears at the top saying “You’re offline.” The sync indicator in the header turns red. You can still:
- Add items to the shopping list
- Add items to the pantry
- Check items off
- Browse everything
Anything you change is queued in local storage. The moment your connection comes back, everything syncs to your partner’s phone. They see your offline additions as if you did them right then.
Sign out
The exit icon on the far right of the header signs you out. You’ll need to log back in with your name and (if you have one) your partner’s invite code. There’s no password — auth is by device for now.
If you want to permanently leave a household, sign out, then sign up again solo (or with a different code).
Common questions
Can I use CookTwo solo? Yes. Tap “Cooking solo” on the welcome screen. You get a household of one. Everything works the same — you just don’t have a second partner colour.
What if my partner and I have very different diets (e.g. vegan + omnivore)? The AI handles it. Each of you sets your own diet in the Profiles tab. The adaptive plating adjusts portions to fit both. Ingredients that don’t fit one partner’s diet show up as “missing” for them but not the other.
Why are my macros different from my partner’s? Same recipe, different portions. The AI sizes each plate to match that person’s goal (lose / maintain / gain) and TDEE. You cook the same pan.
Can I undo a delete? Not yet. Be careful with the × button. We have it on the roadmap.
Where is my data stored? On Cloudflare’s D1 database, associated with your household. Encrypted in transit and at rest. You can sign out and delete your data by emailing us.
Does it work on desktop? Yes — the PWA runs in any modern browser. Pin it to your dock or taskbar for an app-like experience.
Is there a dark mode? Not yet. Cream and sage are the brand. Dark mode is on the roadmap for late 2026.
What about Apple Watch / Wear OS? Not yet. The PWA is mobile-first for now.
How do I know if I’m on Free or Premium?
Check the gear icon → Profiles tab. Your current plan is shown at the bottom. The usage chip in the header also reflects your plan — Free shows 10/10 and Premium shows 70/70 at the start of each day.
What happens if I run out of AI requests? You can still browse, check off items, and manage your pantry. You just can’t generate new meals or chat with the AI until the quota resets at midnight. Premium users get 7x more headroom.